ROS SHORT COURSE Wed Nov 28 – Fri Dec 1, 2017 at WHOI
https://dscl.lrqt_csr.jhu.edu/home/courses/ros_short_course_fall_2017

![]()
Course Description
Contents
This course seeks to introduce students to open-source software tools that are available today for building complex experimental and fieldable robotic systems. The course is grouped into four sections, each of which building on the previous in increasing complexity and specificity: tools and frameworks supporting robotics research, robotics-specific software frameworks, integrating complete robotic systems, and culminates with an independent project of the student’s own design using small mobile robots or other robots in the lab. Students will need to provide a computer (with at least a few GB of memory and a few tens of GB of disk space) running Ubuntu 16.04 LTS Xenial Xerus (http://releases.ubuntu.com/16.04) or one of its variants such as Xubuntu 16.04 LTS (http://xubuntu.org/getxubuntu) and ROS Kinetic Kame (http://wiki.ros.org/kinetic)– note that these specific versions of Linux and ROS are required! Students should have an understanding of intermediate programming in C/C++ (including data structures and dynamic memory allocation) Familiarity with Linux programming. Familiarity with software version control systems (e.g. subversion, mercurial, git), linear algebra. Desirable Course Background: Familiarity with robot kinematics and algorithms such as those covered in EN.530.646 Robot Devices, Kinematics, Dynamics, and Control and EN.600.636 Algorithms for Sensor Based Robotics, and 601.220. Required Course Background: Intermediate Programming in C++ on Linux.
Credits
This short course was conceived of and executed by Louis Whitcomb (JHU), CarlKaiser, Andy Bowen, Andy Maffei (WHOI), and others.
We are gratefully acknowledge the support of the Woods Hole Oceanographic Institution.
Course-Related Web Pages
Course announcement web page
https://www2.whoi.edu/staff/ckaiser/ros-bootcamp
Course web page (this page!):
https://dscl.lcsr.jhu.edu/home/courses/ros_short_course_fall_2017
EduMIP ROS web page:
https://dscl.lcsr.jhu.edu/home/courses/edumip_ros
Instructors
Louis L. Whitcomb
Professor
Department of Mechanical Engineering
G.W.C. Whiting School of Engineering
Johns Hopkins University
office: 115 Hackerman Hall
Phone: 410-516-6724
email: [email]
github.com user id: lwhitcomb
Andrew Spielvogel
PhD Student
Department of Mechanical Engineering
G.W.C. Whiting School of Engineering
Johns Hopkins University
office: 70 Krieger Hall
Phone: 410-516-8021
email: [email]
github.com user id: andrewspielvogel
Class Meeting Schedule
Times: 8:15AM-Noon, 1PM-4PM
Dates: Nov 29, 2017 – Dec 1, 2017
Location: Clark 507, WHOI Quisset Campus
EduMIP Robots
In this course we will use the EduMIP mobile robots – see ROS on the EduMIP Mobile Robot for more information.
The EduMIP robot was created by Prof. Thomas Bewley and his students at UCSD. It is available from Renaissance Robotics
Textbooks
Although there is no required text for the course, if you are new to ROS we recommend that you get and read one or more of the following two introductory ROS texts:
- New in Fall 2017: A Systematic Approach to Learning Robot Programming with ROS 1st Edition by Wyatt Newman, available online in hardcopy or electronic form at Amazon.
- A Gentle Introduction to ROS by Jason M. O’Kane available free online here and available in hardcopy from Amazon
- Learning ROS for Robotics Programming, 2nd Edition, by Enrique Fernandez, Luis Sanchez Crespo, Anil Mahtani, and Aaron Martinez available free online to the JHU community community from the Milton Eisenhower Library’s subscription to Safari Books Online and papaerback or kindle e-book from Amazon
- Programming Robots with ROS: A Practical Introduction to the Robot Operating System, 1st Edition, by Morgan Quigley, Brian Gerkey, and William D. Smart, available in hardcopy from from Amazon, also available free online to the JHU community from the Milton Eisenhower Library’s subscription to Safari Books Online.
Electronic books available through the Milton Eisenhower Library are accessible from on-camps IP addresses. If you are off-campus, you will need to VPN into the campus network to access these electronic books.
Prerequisites
Prerequisite Courses
Required Course Background: Intermediate Programming in C++ on Linux.
This course will benefit you the most if you also are already familiar with the following subjects:
- Kinematics & Dynamics
- Basic Machine Vision
- Basic Probability Theory and Random Processes
- Data Structures
- Linear Algebra
This course will require you to:
- Use the Linux Operating System
- Use the following programming languages:
- Intermediate C++ programming including data structures (absolutely required)
- bash
- Python (optional)
- Use the following markup languages:
- XML
- Use the following software tools:
- Git
- CMake
Required Computer
Students will need to provide their own computer (with at least a few GB of memory and at least ~30 GB of disc space) running Ubuntu 16.04 LTS LTS (Xenial Xerus) (https://wiki.ubuntu.com/XenialXerus/ReleaseNotes) or one of its variants such as Xubuntu). You will also need to install ROS Kinetic Kame (http://wiki.ros.org/kinetic) . Your computer can be dual boot. Linux installations in a virtualbox are NOT an acceptable substitute.
Notes on Insalling Ubuntu on your PC
Problems installing Ubuntu on some Macs
Note that several students have reported difficulty installing Ubuntu linux on Mac notebook PCs.
What Desktop Environment Should I Use?
We recommend the Xubuntu Xfce Desktop , which is based on xfce, s being superior to the default Unity Desktop that comes with Ubuntu. To install the Xubuntu Xfce Desktop after you have installed Ubuntu, first “sudo apt-get install xubuntu-desktop”, then log out of your desktop, select the “Xubuntu Session” (there should be three options: “Ubuntu”, “Xfce”, and “Xubuntu Session” in the desktop selector menu on the login page), and log in.
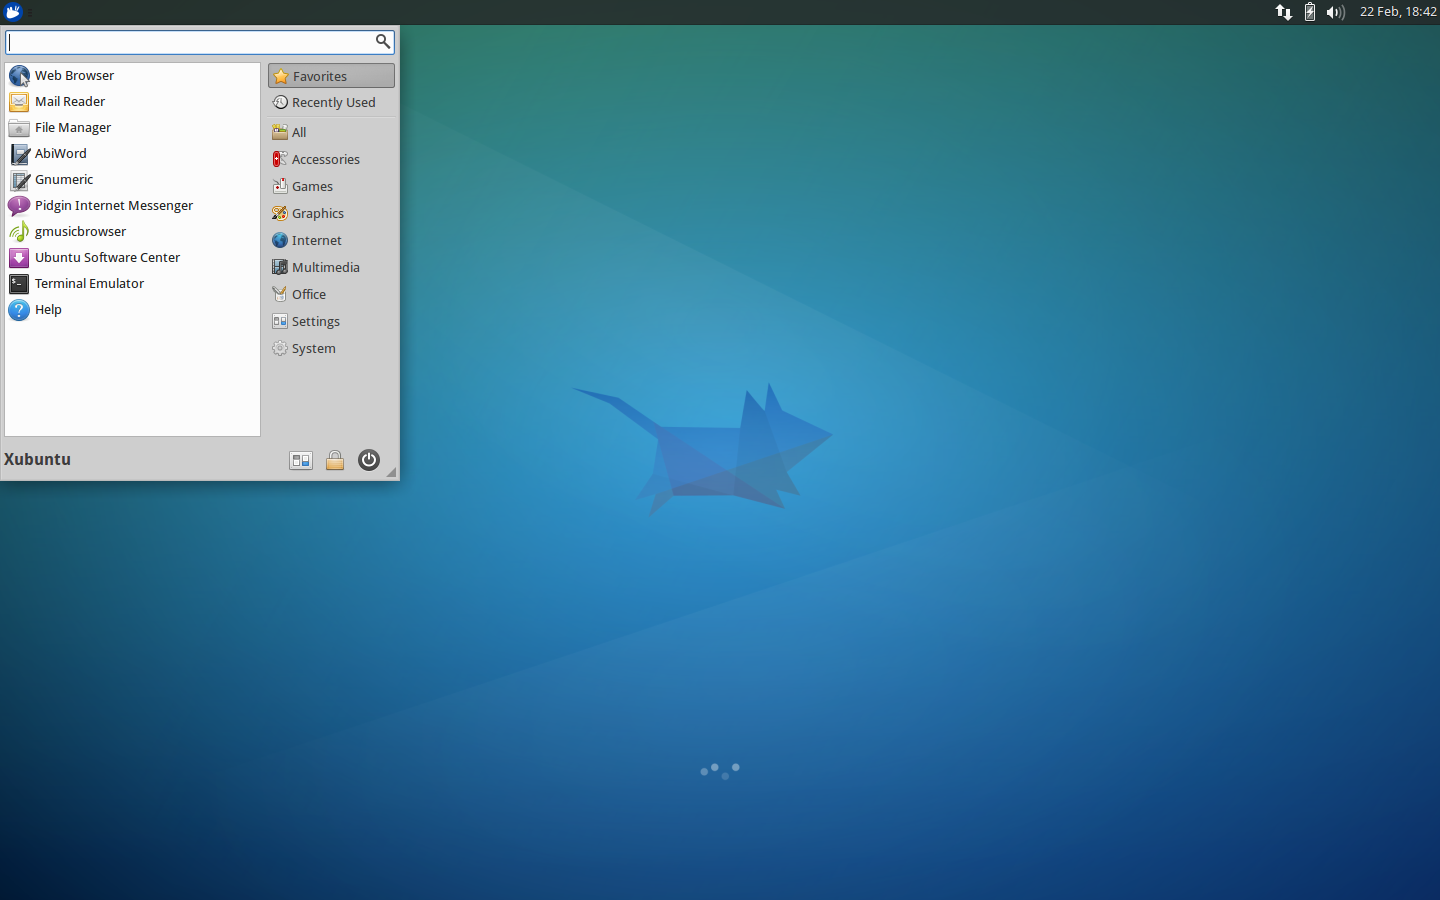
Xubuntu Xfce Desktop Screenshot – click for higher resolution image.
Unity Desktop Screenshot- click for higher resolution image.
WiFi in Class
During this 3-day short course we will have a WiFi WPA/WPA2 access point available in Clark 507 with WiFi SSIDs “turtlebot_2.4gHz” and “turtlebot_5gHz”, with WiFi password provided during the class. The turtlebot’s do not presently deal gracefully with enterprise WiFi authentication, so this access point will be preferred for working with the EduMIP.
In Clark 507 we have set up a WiFi access point with SSID “turtlebot_2.4gHz” and “turtlebot_5gHz”, with WiFi password “turtlebot707”. If you connect your PC to this WiFi network you can type commands in real time during the class.
Your PC’s ~/.bashrc should have this to set up environment variables for ROS. Set your ROS_MASTER_URI to http://192.168.10.101:11311 (the IP address of Louis’s PC), and set the ROS_IP to the IP address of your pc 192.168.10.XXX, where you determine the IP address by
# ----------------------------------------------------------------------
# ROS kinetic environment variables
source /opt/ros/kinetic/setup.bash

# ----------------------------------------------------------------------
# chain local workspace
# source ~/catkin_ws/devel/setup.bash
source ~/ros_catkin_ws/devel/setup.bash

# ----------------------------------------------------------------------
# set ROS_MASTER_URI to IP address and port of PC running roscore
export ROS_MASTER_URI=http://192.168.10.101:11311

# ----------------------------------------------------------------------
# set ROS_HOSTNAME or ROS_IP to IP address of YOUR local PC as
# determined by "ifconfig"
export ROS_IP=192.168.10.123
after you edit !/.bashrc be sure to “source ~/.bashrc” in all interactive shells, or kill and restart your shells.
Youtube Videos of Course Presentations
As an experiment I posted the screen+audio capture videos of my 6 overview presentations for the entire short course (Modules 1-6) on YouTube here:
https://www.youtube.com/channel/UCNvvEcyAZnZa183rhMmuq4Q
The production values are not great – just a screen-capture with audio. I am curious if they are at all useful for you (or not!) – please send me feedback!
Syllabus
Module 1: 8:15AM-Noon Wed Nov 29, 2017: Course Overview and ROS Basics
NOTE: in this course we will exclusively use Ubuntu 16.04 LTS (or an equivalent release such as Xubuntu 16.04 LTS) and the stable ROS Kinetic Kame release.
Topics
- Course Overview
- Course Description
- Prerequisites
- Assignments
- Class Project
- Ethics
- Background of Robot Software Frameworks and The Open-Source Robotics Community
- Development Tools, Managing Code, Environments, Installing Software, Building Code
- The ROS core systems: Packaging, Buildsystems, Messaging, CLI & GUI tools, creating packages, nodes, topics, services, and paramaters.
- Writing a Simple Publisher and Subscriber (C++)
- Examining the Simple Publisher and Subscriber
- Writing a Simple Service and Client (C++)
- Examining the Simple Service and Client
Reading
- ROS
- ROS Introduction
- ROS Get Started Guide Introduction, Concepts, Higher-Level Concepts,Client Libraries,,Technical Overview
- ROS developer’s guide
- ROS C++ Style Guide
- ROS Python Style Guide
- Git: You should already know git (it is a prerequisite for the course), but if you need a refresher, do these tutorials:
- Useful cheat-sheets:
- Documentation on command line tools
Assignments for This Module
Tutorials
- Install Ubuntu 16.04 LTS (or an equivalent release such as Xubuntu 16.04 LTS).
- Install ROS Kinetic Kame
- Complete these Tutorials
- Installing and Configuring Your ROS Environment. NOTE: in this course we will exclusively use Ubuntu 16.04 LTS Xenial Xerus (http://releases.ubuntu.com/16.04) or one of its variants such as Xubuntu 16.04 LTS (http://xubuntu.org/getxubuntu) and ROS Kinetic Kame (http://wiki.ros.org/kinetic).
- Navigating the ROS Filesystem
- Creating a ROS Package
- Building a ROS Package
- Understanding ROS Nodes
- Understanding ROS Topics
- Understanding ROS Services and Parameters
- Using rqt_console and roslaunch
- Using rosed to edit files in ROS
- Creating a ROS msg and a ROS srv
- Writing a publisher and subscriber in C++
- Writing a Simple Publisher and Subscriber (C++)
- Examining the Simple Publisher and Subscriber
- Writing a service and client in C++
- Examining the Simple Service and Client
Assignment #1
- Write and test a ROS package named “beginner_tutorials” comprised of
- a C++ publisher node that publishes a TOPIC and
- a C++ subscriber node that subscribes to this TOPIC.
- OPTIONAL: Write and test a server node that provides a SERVICE and client node that calls this SERVICE.
- Hand in your code project “beginner_tutorials” on github.com
- Login to your github.com account.
- Create a project called “beginner_tutorials” on github,
- Add the TAs and the instructor as members of the project
- Initialize your project “beginner_tutorials” as a git repository
- Add the files to the repo
- Commit them to the repo
- Add the remote repository
- Push your files
- Push the repo to the server
- Email the TAs and instructor when done, with “ROS Short Course Assignment 1” in the subject line.
- See us with questions.
Module 2: 1-5PM Wed Nov 29, 2017: Roslaunch, Nodes, tf, Parameters, and Rosbag
Topics
- rosbag
- roswtf
- ROS.org
- tf
- RVIZ
- Getting and setting parameters in roslaunch and C++ nodes
Reading
- Documentation on tf command-line tools and C++ client libraries
- Documentation on paramater command-line tool (rosparam) and C++ client libraries
- Documentation on rosbag
Assignments for This Module
Tutorials
- Recording and playing back data
- Getting started with roswtf
- Navigating the ROS wiki
- tf tutorials (C++) NOTE: Be sure to do the version of these tutorials for ROS kinetic with the CATKIN build system.
- ROS Parameters
Assignment #2
- Write and test a ROS package named “learning_tf” containing your source code and launch files for
- TF
- tf broadcaster node
- tf listener node
-
- adding a moving tf frame
- ROS Parameters
- A simple C++ ROS node that reads some parameters on startup and uses them
- A roslaunch file that sets the parameters and runs the C++ node
- TF
- Hand in your code project “learning_tf” on github.com and share it with the instructors.
- Email the TAs and instructor when done, with “ROS Short Course Assignment 2” in the subject line.
Module 3: 8:15AM-Noon Thu Nov 30, 2017: EduMIPs, Joy, and ROS Node development in C++
Topics
- Assembling the EduMIP mobile robot
- Installing and testing joysticks
- Publishing /joy topic with the ROS joy package
- Joystick tutorials – including teleoperating a robot from a joystick
- ROS timers
- Writing your own package to subscribe to the joystick /joy and publish a geometry_msgs/Twist topic to command the EduMIP.
- Writing launch files for same.
- Running ROS systems spanning more than one computers.
Reading
- ROS joy package documentation and tutorials
- ROS timer documentation
- Running ROS Across Multiple Machines
- Documentation on some useful standard common message types:
- sensor_msgs/Joy message type this is just one of the standard sensor message types
- geometry_msgs/Twist message type this is just one of the standard geometry message types
- Peruse the documentation on other common message types such as actionlib_msgs, diagnostic_msgs, geometry_msgs, nav_msgs, sensor_msgs, shape_msgs, stereo_msgs, trajectory_msgs, and visualization_msgs.
Assignments for This Module
- Assemble and Test the EduMIP as described here Assembling_and_Testing_the_EduMIP_Kit.
- Set Up Your Beaglebone Black Wireless Board for Your EduMIP: Install a 32GB Debian Jesse image pre-loaded with ROS Kinetic and support for the Robotics Cape on a Micro-SD card on your BBBW. Follow the instructions here: https://dscl.lcsr.jhu.edu/home/courses/edumip_ros
- Joystick Assignment #1 of 3: Install your joystick and test it (nothing to hand in for this part of the assignment)
- Plug in and test your USB joystick
- List the usb devices on your computer with the “lsusb” command with the joystick plugged USB cable connected and also when disconnected.
- See that the device /dev/input/js0 appears when your joystick is connected, and that this device vanishes when the joystick is disconnected
- Use the command “jstest /dev/input/js0” to test your joystick. This utility gives text output of the joystick data.
- Alternatively, test the joystick with the graphical widget “jstest-gtk”.
- Install this utility with the command “sudo apt-get install jstest-gtk”
- Run this utility it with the command “jstest-gtk”.
- Plug in and test your USB joystick
- Joystick Assignment #2 of 3: +Tutorial: Configuring and Using a Linux-Supported Joystick with ROS (nothing to hand in for this part of the assignment)
- Notes on this tutorial for most Ubuntu 16.04 installations:
- The default joystick is /dev/input/js0 (where “0” is numeral zero, not the letter O.
- The permissions for /dev/input/js0 are already OK, i.e. you NOT need to change the permissions for /dev/input/js0 with the command “sudo chmod a+rw /dev/input/js0”.
- The ROS joy_node automatically looks for the device /dev/input/js0. You do NOT need to set the parameter with the command “rosparam set joy_node/dev “/dev/input/js0”.
- Run “roscore” in one terminal, then run “rosrun joy joy_node” and look at the topic /joy
- Be sure to use the commands “rosnode list”, “rostopic list”, and rostopic echo /joy” to explore the /joy topic messages.
- Notes on this tutorial for most Ubuntu 16.04 installations:
- Joystick Assignment #3 of 3 (to hand in) (Git Project name: joy_twist ):
- Create a ROS C++ package entitled “joy_twist”, with dependencies to roscpp, std_msgs, geometry_msgs, and sensor_msgs with the command “catkin_create_pkg joy_twist roscpp std_msgs geometry_msgs sensor_msgs”.
- In this package create a C++ node entitled joy_twist.cpp that subscribes to a sensor_msgs/Joy joystick topic entitled “/joy” and publishes a geometry_msgs/Twist topic named “/edumip/cmd”. We suggest you use a ROS Timer callback function to publish the Twist messages at 10Hz – see ROS Timer documentation for details.
- Your node should assign joystick axis 1 to twist.linear.x, and joystick axis 0 to twisr.angular.z — BUT YOU CAN CHOOSE A DIFFERENT MAPPING IF YOU LIKE — you may need to change a sign in the assignment so that pushing the joystick forward makes twist.linear.x positive, and pushing the joystick to the right makes the twist.angular.z positive.
- In this package create a launch file entitled joy_twist.launch iThe edumip_balance_ros noden the /launch directory that
- Launches a joy node from the ROS joy package, which opens and reads the USB joystick values and publishes them as sensor_msgs/Joy messages on the topic /joy
- Launches your joy_twist node which subscribes to sensor_msgs/Joy messages on the /joy topic and publishes geometry_msgs/Twist messages on the /edumip/cmd topic.
- Be sure to use the commands “rosnode list”, “rostopic list”, “rostopic echo”, “rostopic type”, and “rostopic hz” to explore the /joy and /edumip/cmd topics.
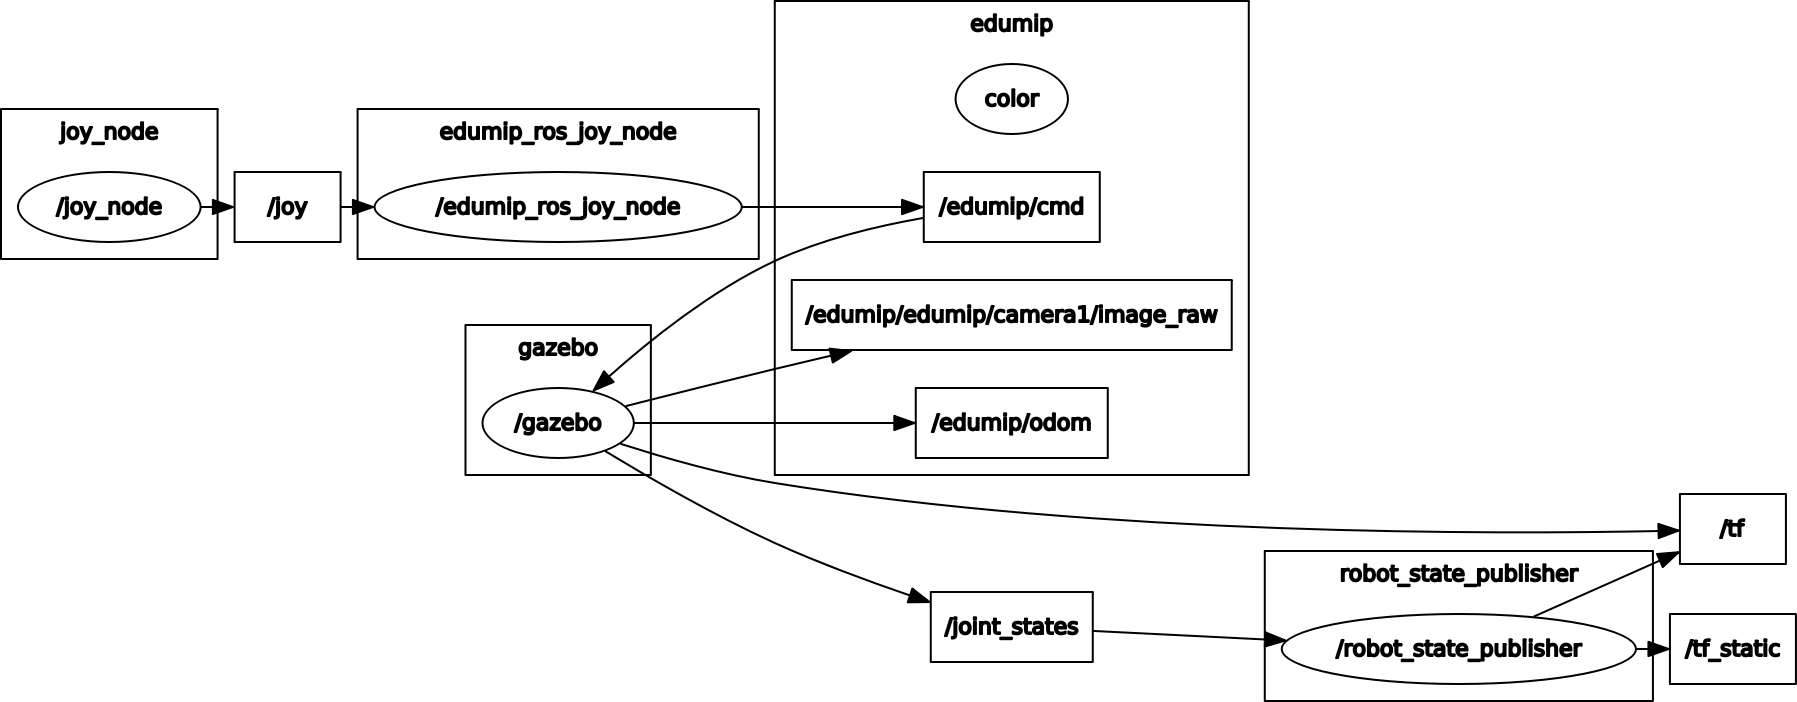
- Run rqt_graph to see the nodes and topics graphically.
- Joystick Control of the EduMIP and multi-computer ROS Programming: You will “hand in” this part of the assignment by demonstrating joystick control of your EduMIP to one of the instructors.
- Running ROS Across Multiple Machines: Do the tutorial Running ROS Across Multiple Machines. Do not hand in anything for this tutorial, it is just to get you started on running ROS across multiple computers.
- Configure WiFi on your EduMIP: Follow the instructions here: https://dscl.lcsr.jhu.edu/home/courses/edumip_ros/#WiFi_BBBL_BBB_Wireless_BBB_Classic_USB_WiFi_Adapter
- Determine the IP addresses of your PC and your EdhMIP:
- ifconfig: Use the command “ifconfig” to see all configured network interfaces (Ethernet, WiFi, USB, etc) on your machine.
- iwconfig: Use the command “iwconfig” to see all configured WiFi network interfaces on your machine.
- Who am I? The easiest way to determine the IP address (or addresses) of a Linux machine is to log into it and use the command “ifconfig”.
- In this example I will assume the following IP addresses (YOURS WILL BE DIFFERENT):
- My PC has IP address 192.168.10.101
- My EduMIP BBBW has IP address 192.168.10.102
- On your PC set the ROS environment variables to look for the ros master (roscore) on the PC with the .bashrc commands:
- “export ROS_MASTER_URI=http://192.168.10.101:11311” <- this tells ROS the IP address of the machine that is running the ros master (roscore).
- “export ROS_IP=192.168.10.101” <- this tells ROS the IP address of this machine (your PC).
- On your EduMIP set the ROS environment variables to look for the ros master (roscore) on the PC with the .bashrc commands:
- “export ROS_MASTER_URI=http://192.168.10.101:11311” <- this tells ROS the IP address of the machine that is running the ros master (roscore).
- “export ROS_IP=192.168.10.102” <- this tells ROS the IP address of this machine (your EduMIP).
- Test your configuration:
- On your PC, in a new shell, run roscore.
- On your PC, in a new shell, run “rostopic list”, you should see the standard default topics from the roscore on your PC.
- On your EduMIP, in a new shell, run “rostopic list”, you should see the standard default topics from the roscore on your PC. Yay!
- You can now publish a topic on one machine, and subscribe to the topic on the other machine. For example
- On your EduMip, publish a topic with command “rostopic pub -r 1 my_topic std_msgs/String “hello there”
- On your PC, subscribe to this topic with “rostopic echo /my_topic”
- On your PC, run “rqt_graph” to visualize the nodes and topics.


- Now you can control your EduMIP from a joystick on your PC:
- On your PC run your joy_twist launch file with the command “roslaunch joy_twist joy_twist.launch” to run roscore, joy and joy_twist nodes. Recall that:
- The joy node publishes sensor_msgs/Joy messages on the topic /joy
- The joy_twist node subscribes to sensor_msgs/Joy messages on the topic /joy and publishes geometry_msgs/Twist messages the /edumip/cmd topic.
- On your EduMIP run edumip_balance_ros with the command “roslaunch edumip_balance_ros edumip_balance_ros”. Recall that:
- The edumip_balance_ros node subscribes geometry_msgs/Twist messages the /edumip/cmd topic and
- The edumip_balance_ros node publishes edumip_balance_ros/EduMipState messages on the topic /edumip/state
- Stand up your EduMIP and take it for a drive.
- Explore the ROS topics, and rqt_graph.
- On your PC run your joy_twist launch file with the command “roslaunch joy_twist joy_twist.launch” to run roscore, joy and joy_twist nodes. Recall that:
- DEMO IT TO YOUR INSTRUCTORS!
Module 4: 1-5PM Thu Nov 30, 2017: URDF and Robot State Publisher
Topics
- Unified Robot Description Format (URDF)
- Robot State Publisher
Reading
- Notes from Class: In class we downloaded the urdef tutorial package into my catkin workspace. Here are few notes on the steps taken to do this. In this example we will download a local copy of the urdef_tutorial ROS package into my catkin workspace~/ros_catkin_ws/src/urdf_tutorial. You can edit the local copy in your workspace. The system copy located here /opt/ros/kinetic/share/urdf_tutorial but you cannot edit these files because they are protected system files. Better to edit your own local copy in your catkin workspace rather than mucking with the system copy. This is an example of workspace overlay where we create a package in a local workspace that ROS will use in preference to the default system package of the same name. Linux commands are shown in bold font. Comments are in italic font.
- cd ~/ros_catkin_ws/src (cd to ~/ros_catkin_ws/src)
- git clone https://github.com/ros/urdf_tutorial.git (clone the git tutorial from github. Note that this creates the directory ~/catkin_ws/src/urdf_tutorial and associated subdirectories.)
- cd ~/catkin_ws (cd to ~/catkin_ws)
- rm -r devel build (remove the catkin_ws/devel and catkin_ws/build directory trees, which deletes ~/catkin_ws/devel/setup.bash
- catkin_make (Builds everything in my workspace from scratch, including generate a new ~/catkin_ws/devel/setup.bash)
- source devel/setup.bash (Source the newly created file ~/catkin_ws/devel/setup.bash to add this new workspace to the ROS bash environment variables, in particular it will add the present workspace to the ROS_PACKAGE_PATH environment variable)
- echo $ROS_PACKAGE_PATH (Look again at the ROS_PACKAGE_PATH environment variable that was set by the previous command. It should NOW be a string with your catkin workspace listed at the first element, followed by the standard package path like this: ROS_PACKAGE_PATH=/home/llw/ros_catkin_ws/src:/opt/ros/kinetic/share)
- rospack profile (This command forces rospack to rebuild the cache of the ros package path that is used by roscd. The cache the text file ~/.ros/rospack_cache).
- roscd urdf_tutorial (Now roscd will take me to my local copy of the urdef tutorial in ~/catkin_ws/src/urdf_tutorial instead of taking me to the system copy located here /opt/ros/kinetic/share/urdf_tutorial )
- roslaunch urdf_tutorial display.launch model:=urdf/01-myfirst.urdf (Now I can run the tutorial exercise and edit the local URDF files in ~/catkin_ws/src/urdf_tutorial/urdf)
- Note that the later tutorial urdf files such as urdf/05-visual.urdf refer to a PR2 gripper model mesh files. If you get error messages from RVIZ like “[ERROR] [1393792989.872632824]: Could not load resource [package://pr2_description/meshes/gripper_v0/l_finger.dae]: Unable to open file “package://pr2_description/meshes/gripper_v0/l_finger.dae” then you need to install the PR2 mesh files. You can install the PR2 model files with the command sudo apt-get install ros-kinetic-pr2-common
- Note that beginning with urdf/05-visual.urdf RVIZ throws lots of warnings like “TIFFFieldWithTag: Internal error, unknown tag 0x829a.” but the program runs OK.
Assignments for This Module
Tutorials
- Learning URDF Step by Step
- 1. Building a Visual Robot Model with URDF from Scratch
- 2. Building a Movable Robot Model with URDF
- 3. Adding Physical and Collision Properties to a URDF Model
- 4. Using Xacro to Clean Up a URDF File
- Learning URDF (including C++ API)
- 1. Create your own urdf file
- 2. Parse a urdf file
- 3. Using the robot state publisher on your own robot
- 4. Start using the KDL parser (You can skip this tutorial for now if you like, it is not required for this module’s assignment.)
- 5. Using urdf with robot_state_publisher
-
Assignment #4
- Develop a ROS package named edumip_my_robot for your EduMIP.

- Your package should consist of at least the following:
- An URDF file named urdf/edumip_my_robot.urdf’ (or better yet a xacro file urdf/edumip_my_robot.xacro ) describing the robot links and joints. Your link and joint names should be prcisely the following:
- A body link named “edumip_body”
- A left wheel link named “wheelL”
- A right wheel link named “wheelR”
- A left continuous joint named “jointL” with parent link “edumip_body” and child link “wheelL”.
- A right continuous joint named “jointR” with parent link “edumip_body” and child link “wheelR”.
- Here are the measured parameters I used in my xacro file – units are meters and radians:
- An URDF file named urdf/edumip_my_robot.urdf’ (or better yet a xacro file urdf/edumip_my_robot.xacro ) describing the robot links and joints. Your link and joint names should be prcisely the following:
<!-- Numerical Macros - units are meters and radians -->
<xacro:property name="wheel_separation" value="0.070" />
<xacro:property name="wheel_radius" value="0.034" />
<xacro:property name="wheel_width"  value="0.010" />
<xacro:property name="body_height"  value="0.1" />
<xacro:property name="body_width"   value="0.050" />
<xacro:property name="body_length"  value="0.035" />
-
-
- A C++ node named src/edumup_my_robot_publisher.cpp
- Your node should subscribe to the /edumip/state message that has recently been expanded to include wheel joint angles and odometry data (i.e. robot X, Y, and heading).
- Your node should publish the following:
- sensor_msgs/JointState messages for this robot on the topic /joint_states.. Look at the message definition file edumip_msgs/msgs/EduMipState.msg to see comments on the state message fields.
- A tf transform from the fixed “world” frame to this robot’s “robot_base” frame that specified the moving position and orientation of the robot with respect to the fixed “world” frame.
- NOTE:Your node should have a SINGLE callback function for subscribing to the /edumip/state topic, and within this callback function it should publish the the /jount_states topic and the /tf topic.

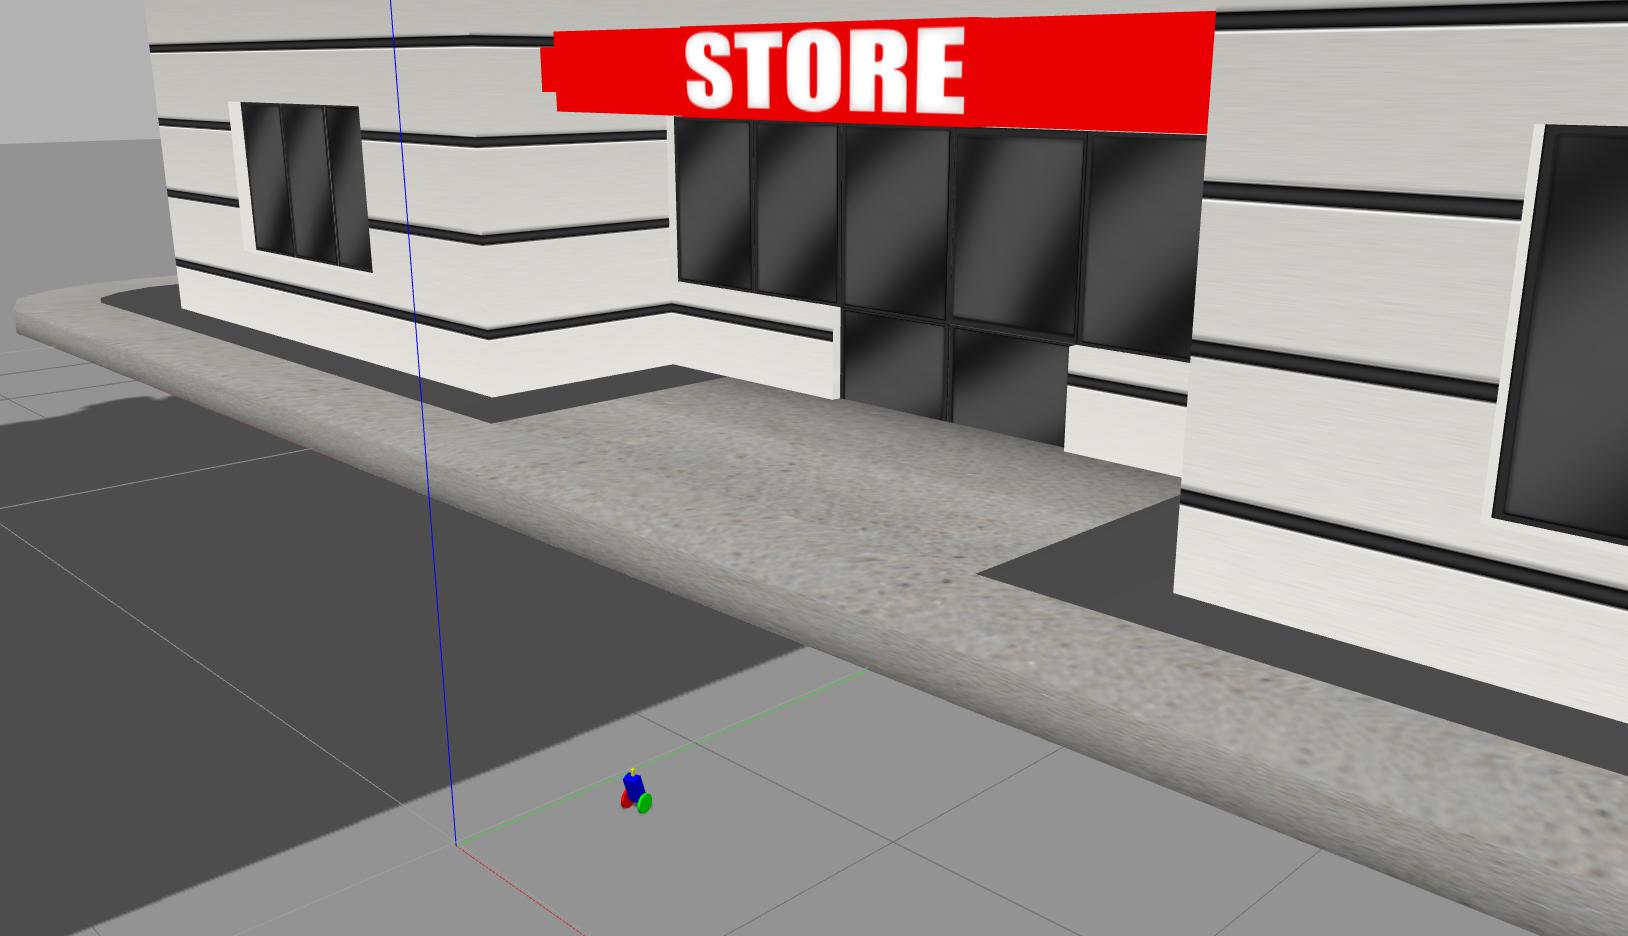
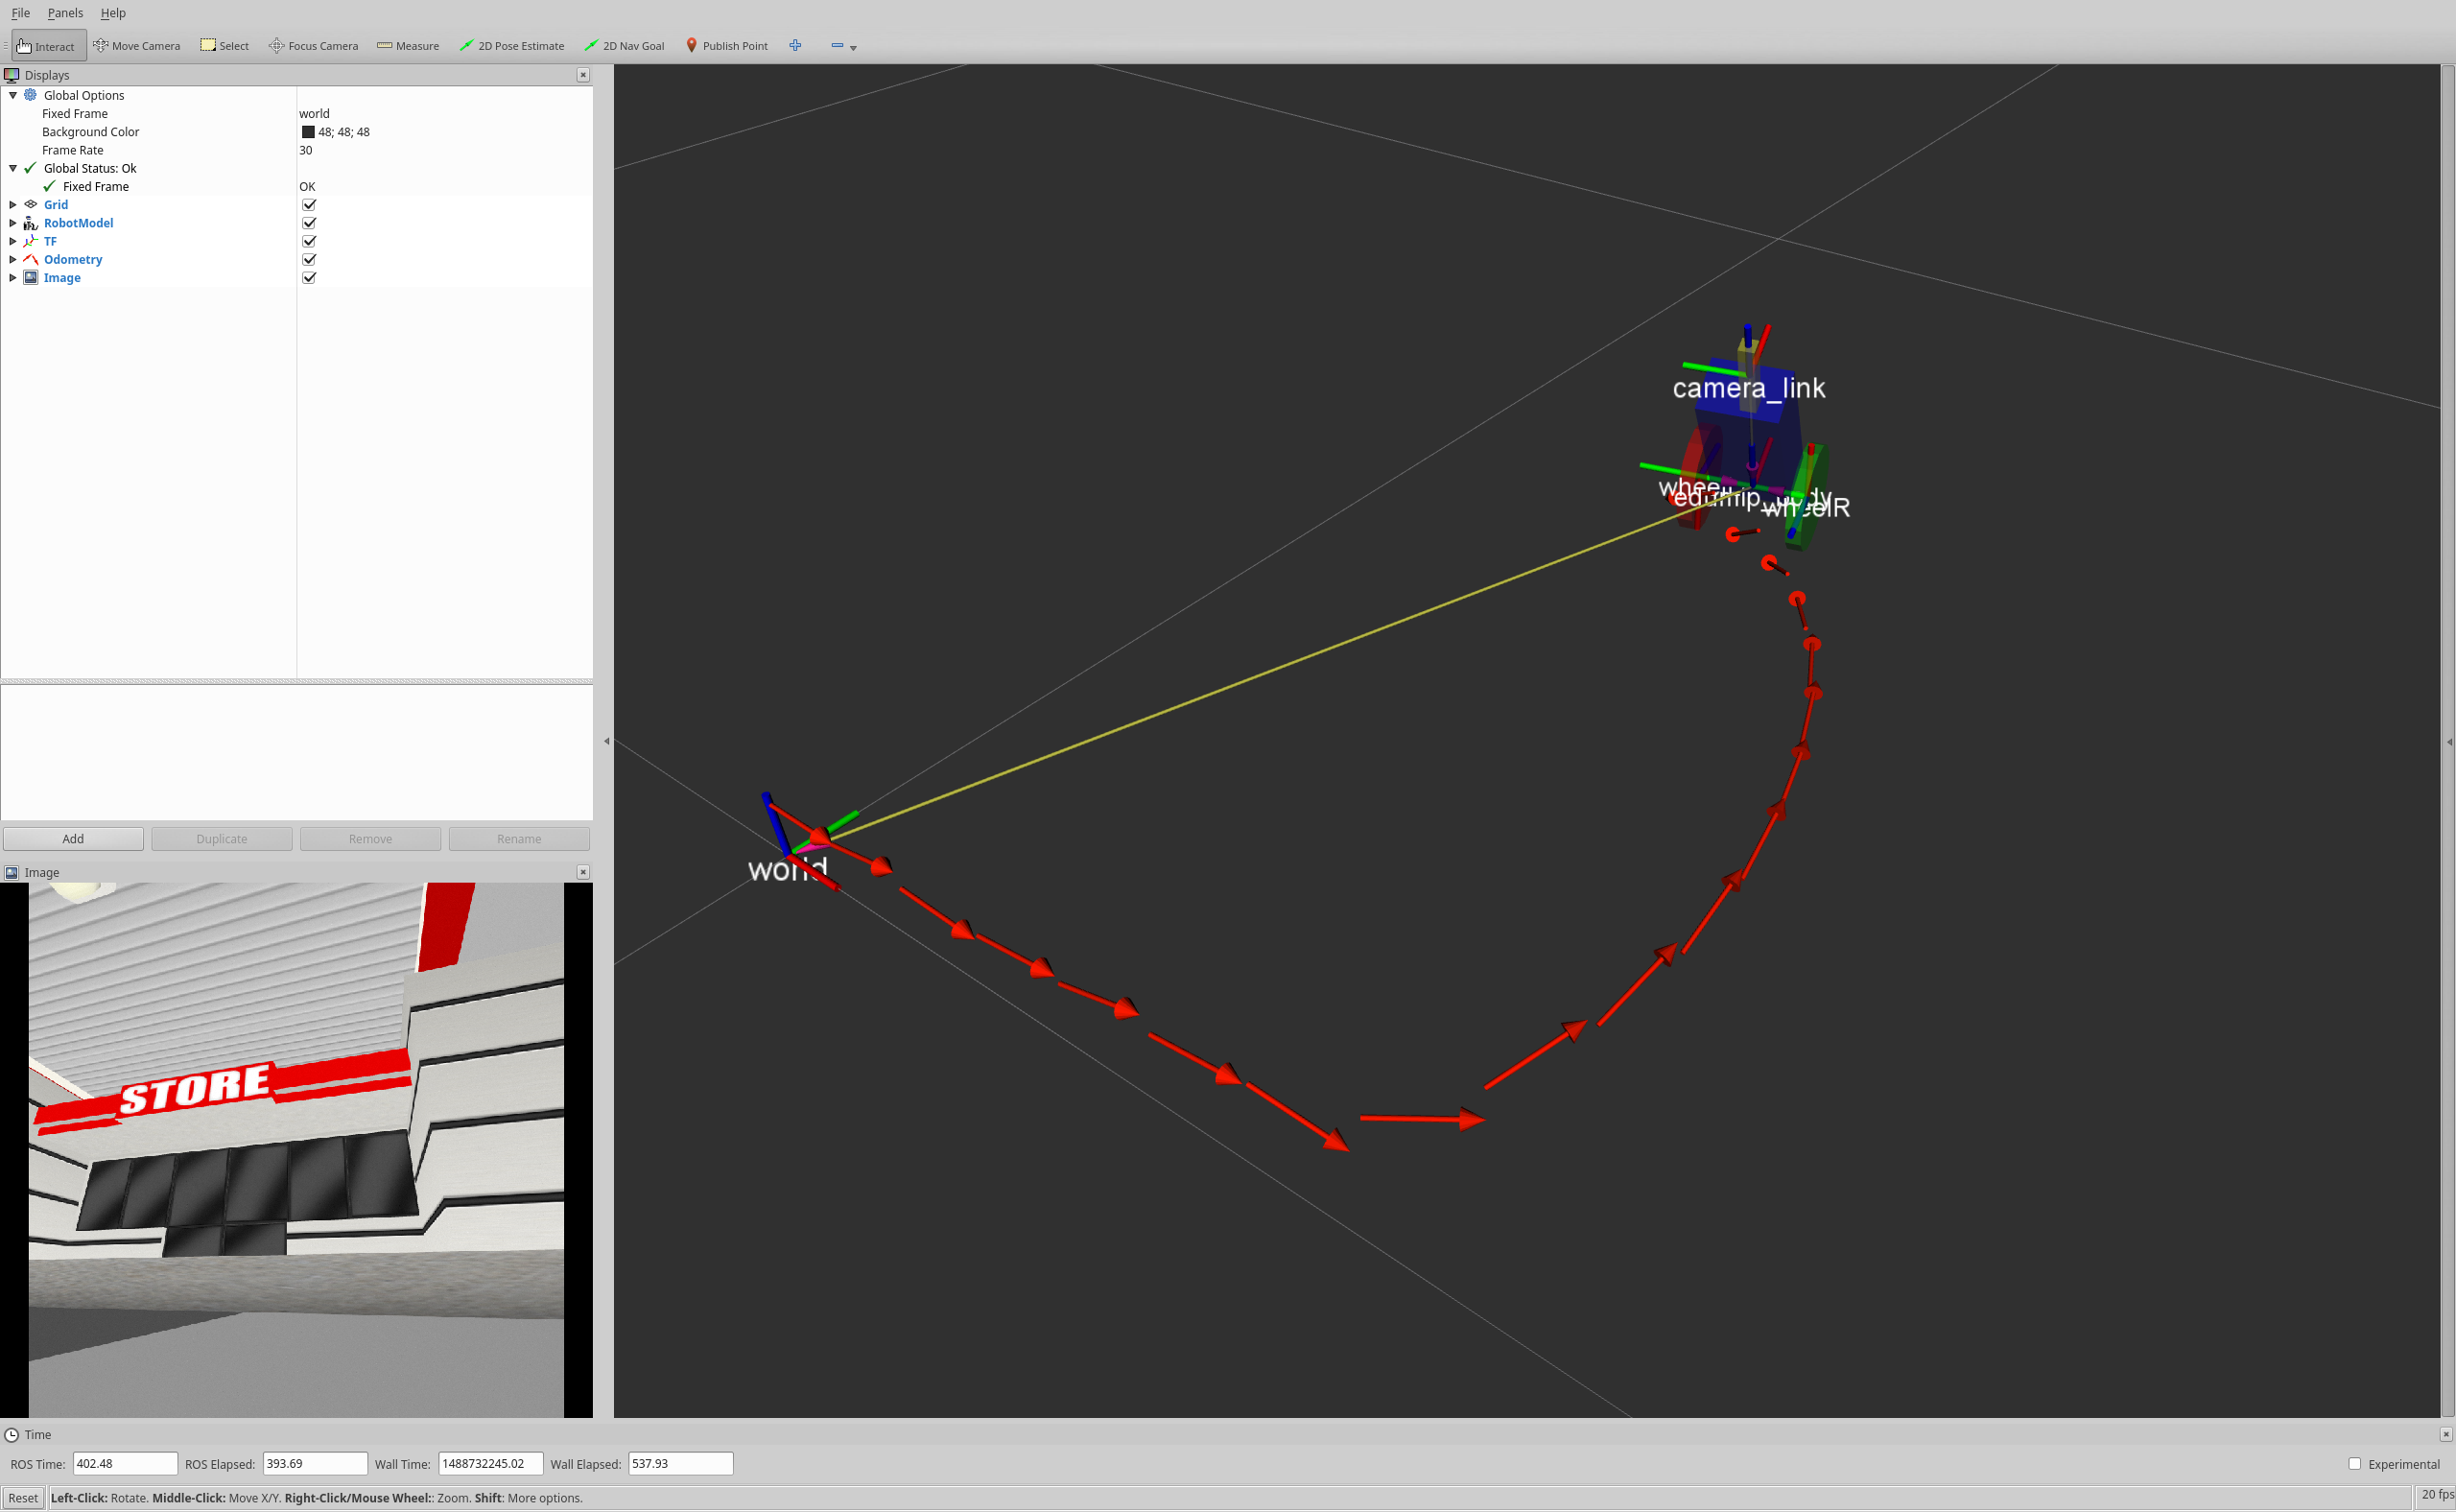
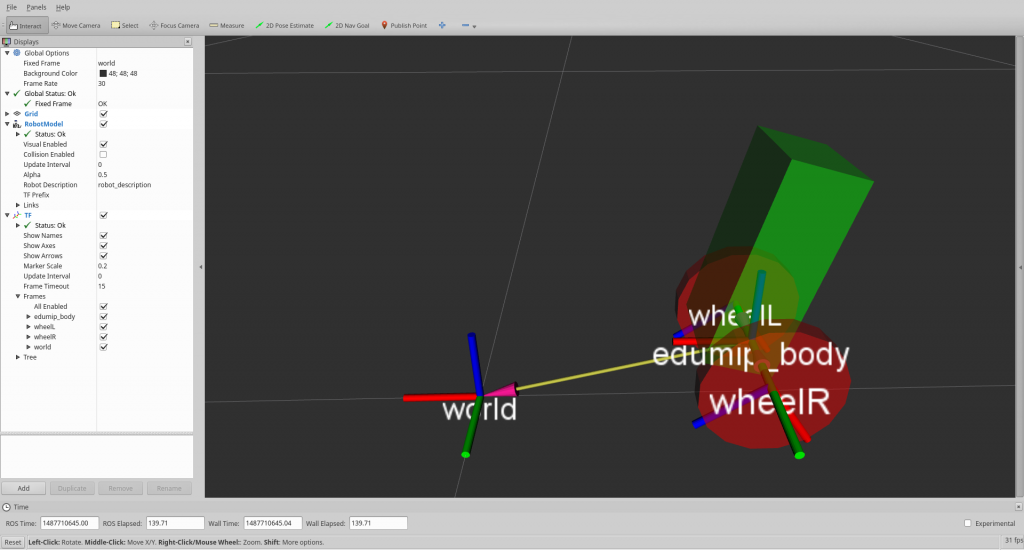 RVIZ screen shot for Assignment #4 showing visualization of your robot_model (defined by your urdf or xacro file) and visualization of your tf frames. Click for higher resolution image.
- A RVIZ initialization file called “rviz/edumip_my_robot.rviz” that displays your robot_model and tf frames.
- A launch file named ‘launch/edumip_my_robot.launchthat
- Launches a joy node from the system-defined joy ROS package. Recall that the joy node publishes sensor_msgs/Joy messages on the topic /joy
- Launches your joy_twist node from the joy_twist package that you wrote for last module’s assignment. Recall that the joy_twist node subscribes to sensor_msgs/Joy messages on the topic /joy and publishes geometry_msgs/Twist messages the /edumip/cmd topic.
- Launches your custom edumup_my_robot_publisher C++ node from your edumip_my_robot package that you wrote for this module’s assignment. Recall that this node subscribes to the /edumip/state topic and publishes on the /jount_states topic and the /tf topic as described earlier in this assignment.
- Launches a standard robot_state_publisher node from the robot_state_publisher package. Recall that this node subscribes to the /jount_states topic and the robot_description parameter and publishes /tf frames for the robot based onyoru urdef and the joint_states.
- Sets the parameter “robot_description” to load your urdf/edumip_my_robot.urdf’ (or .xacro) that you wrote for this module to model your edumip.
- Launches RVIZ specifying the a rviz initialization file entitles rviz/edumip_my_robot.rviz. hat you create to visualize your robot_model (defined by your urdf or xacro file) and visualization of your tf frames.
- Now you should be able to drive your robot around with your joystick and see your robot model drive around in RVIZ complete with depiction of the robot and its coordinate frames.
- NOTE that RVIZ will not display your robot model correctly until it receives valid /tf transforms for all of the robot links. If the link /tf transforms are not valid then RVIZ will show errors in the “robot_model” RVIZ GUI, and the robot links will appear white instead of the colors specified in your urdf/xacro file.
-
- Push the finished package edumip_my_robot gitand share it with the course instructors.
- DEMO IT TO YOUR INSTRUCTORS!

Module 5: 8:15AM-Noon Fri Dec 1, 2017: Gazebo Intro, SDF, and worlds
Topics
- Simulating robots, their environments, and robot-environment interaction with Gazebo
- Gazebo ROS integration.
- NOTE: You do not need to install Gazebo. Your full ROS kinetic desktop installation will have installed Gazebo V7.0.0 So DO NOT follow the installation instructions on gazebosim.org. If for some reason the ros gazebo package is not installed, install it with sudo apt-get install ros-kinetic-gazebo-ros ros-kinetic-gazebo-ros-pkgs ros-kinetic-gazebo-ros-control
- You can verify that Gazebo is installed by issuing the command “gazebo” on the command line – a gazebo window should open after a few seconds delay.
- NOTE: Gazebo is CPU-intensive, and will not run very well in virtual boxes.
Reading
- Gazebo Overview
- Gazebo API
- SDFormat Specification: The SDF XML file format is a superset of URDF. SDF files are how Gazebo defines robots and the environment. You can generate SDF from URDF or XACRO on-the-fly, so in practice it is easier to maintain a single XACRO file, and use it to generate URDF and SDF from it on-the fly.
Assignments to for This Module
Tutorials
- Gazebo Version 7.0 Tutorials
- Note: In this next set of Gazebo tutorials you will use the command-line “gazebo”, not the ROS gazebo package.
- Beginner – First-time Gazebo Users
- Overview and Installation SKIP THE INSTRUCTIONS FOR INSTALLING GAZEBO THAT ARE LISTED IN THIS TUTORIAL. A ROS-COMPATIBLE VERSION OF GAZEBO WAS AUTOMATICALLY INSTALLED WITH ROS KINETIC
- Understanding the GUI
- Skip this one for now: Model Editor
- Get Started
- Skip “Install”. Do not install Gazebo, it was installed when your installed the full ROS kinetic desktop.
- Quick Start: How to run Gazebo with a simple environment.
- Gazebo Components: This page provides and overview of the basic components in a Gazebo simulation.
- Gazebo Architecture: Overview of Gazebo’s code structure.
- Screen Shots
- Build a Robot
- Model Structure and Requirements: How Gazebo finds and load models, and requirements for creating a model.
- Skip this one for now: How to contribute a model.
- Make a model: Describes how to make models.
- Make a mobile robot: How to make model for a 2-wheeled mobile robot.
- Import Meshes
- Attach Meshes
- Add a Sensor to the Robot
- Make a simple gripper
- Attach gripper to robot.
- Build a World
- Build a world
- Modifying a world
- Skip these for now: “Digital Elevation Models”, “Population of models”, and “Building Editor” for now — you can return to them at a later date when and if you need them. Digital elevation models can be particularly useful in providing realistic simulated terrain for a simulated robot to explore.
- Friction: How to set friction properties. Be sure to experiment with the more exhaustive friction example linked at the very end of this tutorial. This is the example that I showed in class with sliding blocks. Modify the gravity, friction, and initial position/orientation of the objects to observe different dynamics.
- Connect to ROS: ROS integration
- Note: In these ROS Gazebo tutorials you will use the ROS Gazebo package (“rosrun gazebo_ros gazebo”), not the command-line “gazebo”.
- Ros Overview
- Skip this: Which combination of ROS/Gazebo versions to use You can skip this as you will use the default version 7.0.0 that comes with ROS kinetic — see gazebo ROS installation notes above.
- Installing gazebo_ros_pkgs
- Note that in this tutorial in addition to apt-get installing some gazebo binary packages you will also clone the KINETIC branch of git clone https://github.com/ros-simulation/gazebo_ros_pkgs.git into your ROS workspace with the command “git clone https://github.com/ros-simulation/gazebo_ros_pkgs.git -b kinetic-devel”.
- Using roslaunch: Using roslaunch to start Gazebo, world files and URDF models
- URDF in Gazebo: Using a URDF in Gazebo
- Note that you will clone git clone https://github.com/ros-simulation/gazebo_ros_demos.git into your ROS workspace (~catkin_ws/src) in this tutorial.
Assignment #5

- Create a new Gazebo ROS package named edumip_my_robot_gazebo_ros with dependencies to at least the following packages: roscpp tf std_msgs sensor_msgs geometry_msgs edumip_msgs gazebo_msgs gazebo_ros.
- DO not use the directory structure specified in the Creating your own Gazebo ROS Package tutorial and exemplified in the URDF in Gazebo RRBot package that you downloaded and used in this tutorial.
- Your project should have at least the following sub-directories:
- edumip_my_robot_gazebo_ros/urdf
- edumip_my_robot_gazebo_ros/launch
- edumip_my_robot_gazebo_ros/worlds
- Create a XACRO file urdf/edumip_my_robot.xacro for your EduMip – you can begin with the XACRO file you created for HW#4. If you did not create a XACRO file for HX#4, then do so now.
- You can use a xacro file in your launch file to set the robot_descriptionparameter with the launch file command “<param name=”robot_description” command=”$(find xacro)/xacro –inorder $(find edumip_my_robot_gazebo_ros)/urdf/edumip_my_robot.xacro” />’“.
- Add additional statements to your XACRO file so that it can be automatically translated to SDF format for use by Gazebo.
- Your robot should have one link named “edumip_body” with at least the following attributes:
- <visual> with
- <origin>
- <geometry>
- <material>
- <collision>
- <origin>
- <geometry>
- <inertial> with
- <origin>
- <mass>
- <inertia>
- <visual> with
- Your robot should have two wheels named “WheelL” and “WheelR” with at least these attributes:
- <visual> with
- <origin>
- <geometry>
- <material>
- <collision>
- <origin>
- <geometry>
- <inertial> with
- <origin>
- <mass>
- <inertia>
- <visual> with
- Your robot should have two joints named “JointL” and “JointR”, each with
- <parent>
- <child>
- <origin>
- <axis>
- Your robot should have one link named “edumip_body” with at least the following attributes:
- Your EduMIP should be statically stable at rest in a normal gravitational field when on a flat surface – so offset the inertiacenter-of-mass origin of edumip_body to be BELOW the wheel joints – doing so will make the model balance upright due.
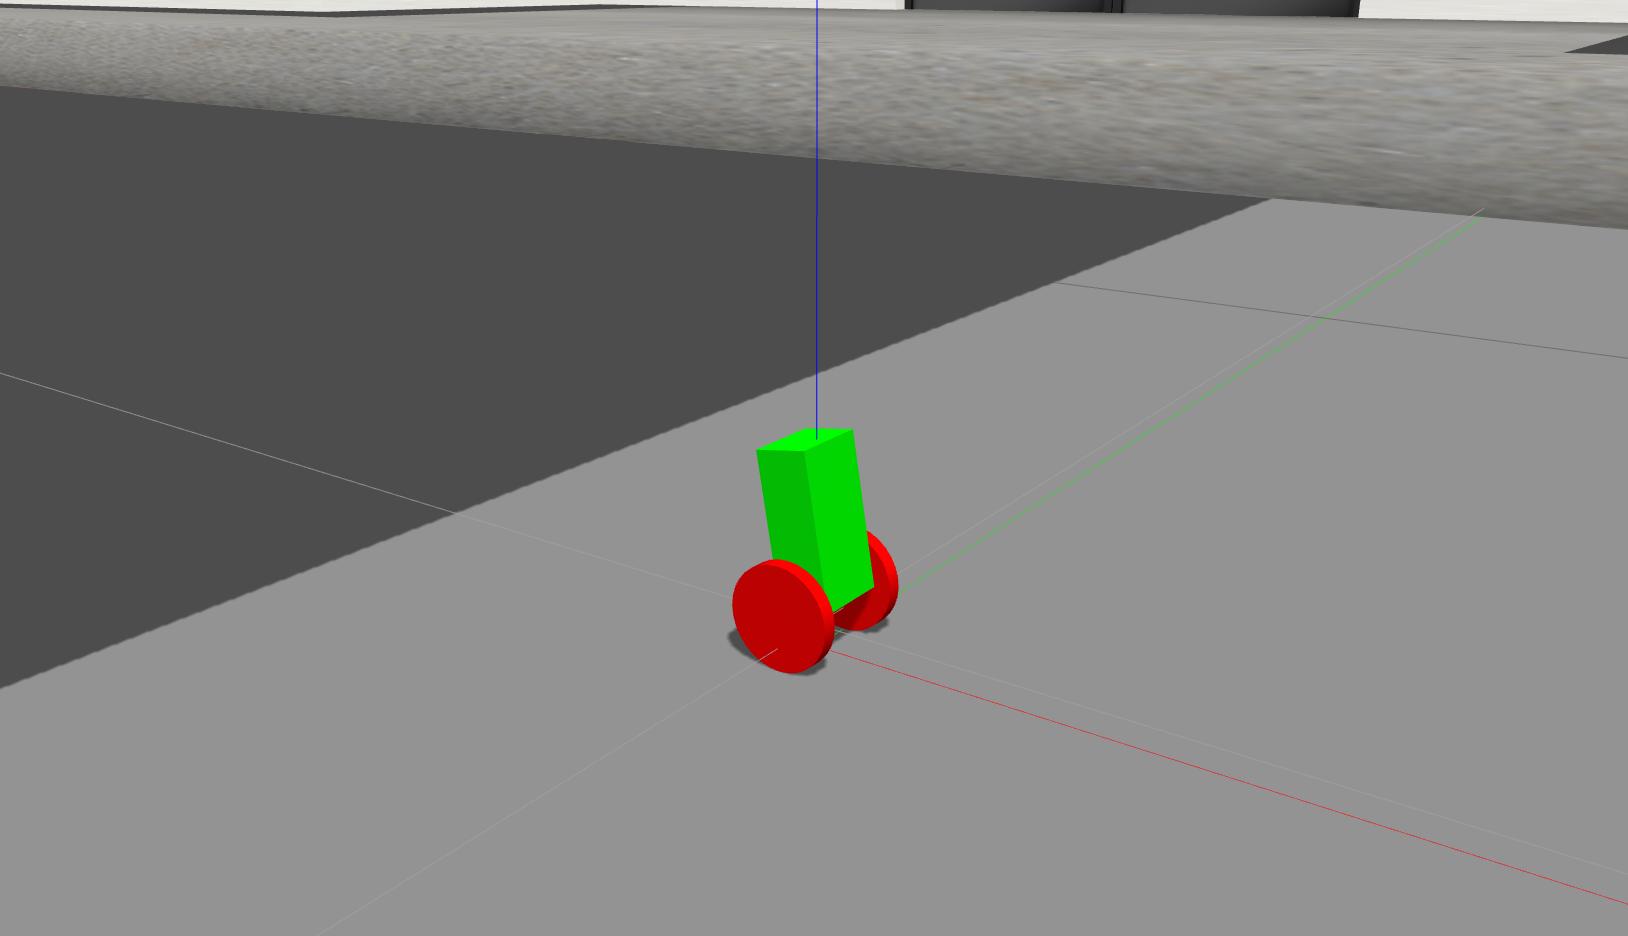
- It should have nice happy colors.
- Colors are specified differently for RVIZ (urdf) and Gazebo (sdf). Coulomb friction is specified as <mu1> and <mu2> dimensionless parameters. You can add these lines to your XACRO file which will generate SDF-compatible color specifications when the XACRO file is translated to SDF:
 <gazebo reference="edumip_body">
   <material>Gazebo/Blue</material>
   <mu1>0.2</mu1>
   <mu2>0.2</mu2>
 </gazebo>
 <gazebo reference="wheelR">
   <material>Gazebo/Green</material>
   <mu1>0.2</mu1>
   <mu2>0.2</mu2>
 </gazebo>
 <gazebo reference="wheelL">
   <material>Gazebo/Red</material>
   <mu1>0.2</mu1>
   <mu2>0.2</mu2>
 </gazebo>
- Create a gazebo world file named edumip_my_robot.world which provides at least horizontal plane, gravity, and some objects or buildings. Your world file can contain your robot model, or you can spawn your robot model in your launch file. In Gazebo you should be able to cause the robot to move on the plane by applying torques to the wheel (or leg) joints.
- Create a launch file named edumip_my_robot_gazebo.launch which launches your robot world with your robot in it — recall that you did this in the assigned tutorial section on roslaunch with gazebo. Your launch file should do the following:
- Set some parameters – see how the “$(find…” command is used in the tutorial launch files.
- Set the parameter robot_description to the contents of your xacro file with the command ” <param name=”robot_description” command=”$(find xacro)/xacro –inorder $(find edumip_my_robot_gazebo_ros)/urdf/edumip_my_robot.xacro” />”
- Set the parameter world_name to the name of the world file using similar syntax.
- Spawn a model of your EduMip with the roslaunch file using the “spawn_model” node in the “gazebo_ros” package with arguments args=”-param robot_description -urdf -model edumip_my_robot”. Read the documentation of this package for details.
- Set some parameters – see how the “$(find…” command is used in the tutorial launch files.
- Run your launch file with roslaunch. It should launch gazebo with your robot model at the origin.
- Make your robot move around in the Gzebo World:
- Select your robot with the mouse
- On the right hand side og the gazebo window, with your mouse swipe open the “Joint” pane.
- Apply some torque to he joints to make your robot move.
- Introspect on the topics with rostopic list’ and rostopic echo.
- Make your robot move around in the Gzebo World:
- Push the finished package edumip_my_robot_gazebo_ros as a new repo github.com and share it with the course instructors.
Module 6: 1-5PM Fri Dec 1, 2017: Gazebo physical simulation, ROS Integration
Topics
- Simulating robots, their environments, and robot-environment interaction with Gazebo
- Gazebo ROS integration.
- Gazebo Intermediate Concepts
Reading
- Gazebo Overview
- Gazebo API
- SDFormat Specification SDF is how Gazebo defines robots and the environment. You can generate SDF from URDF.
- Gazebo ROS Packages Documentation
- ROS pluginlib
Assignments to do for This Module
Tutorials
- Gazebo Version 2.2 Tutorials

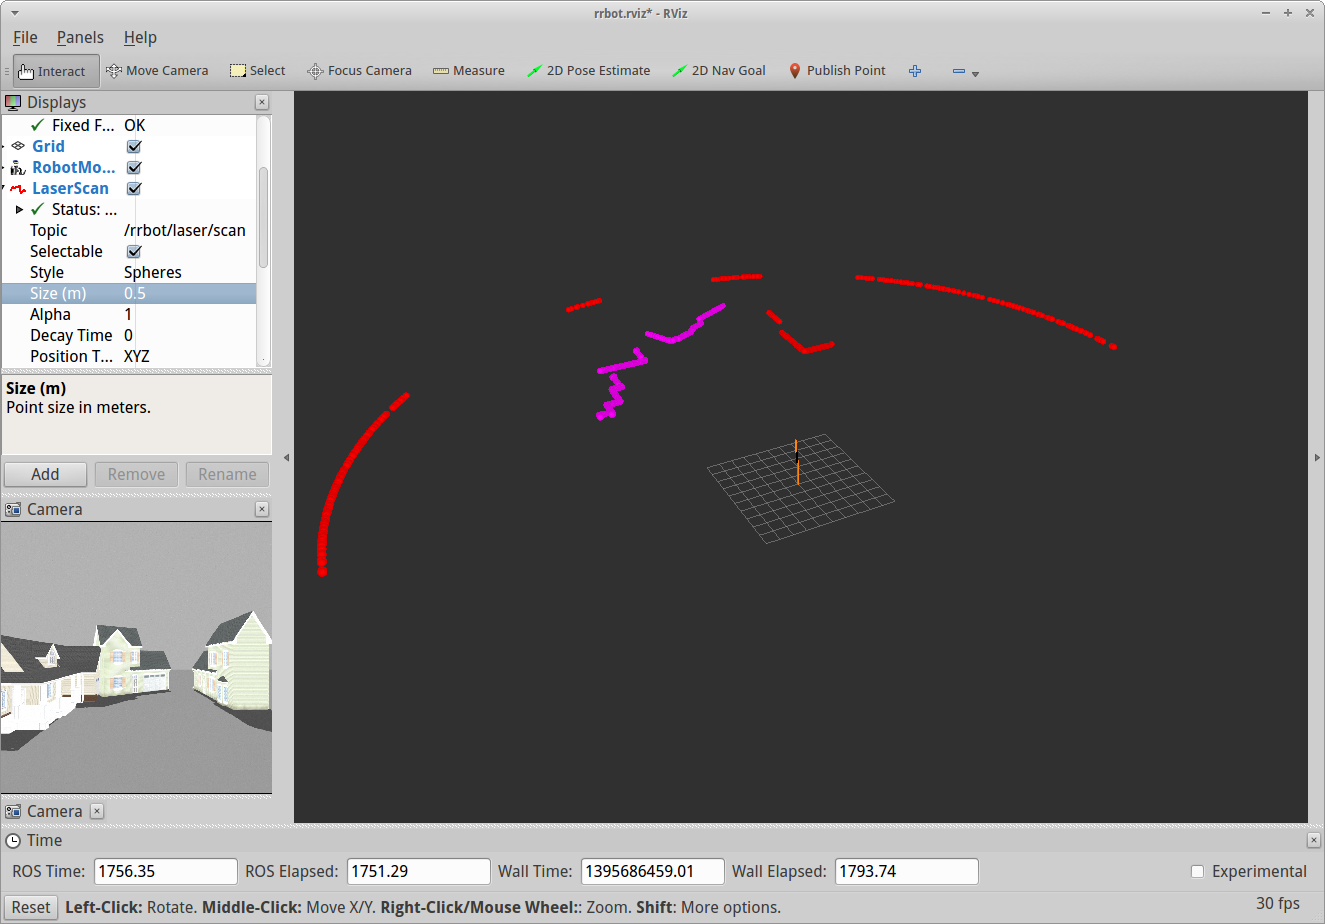
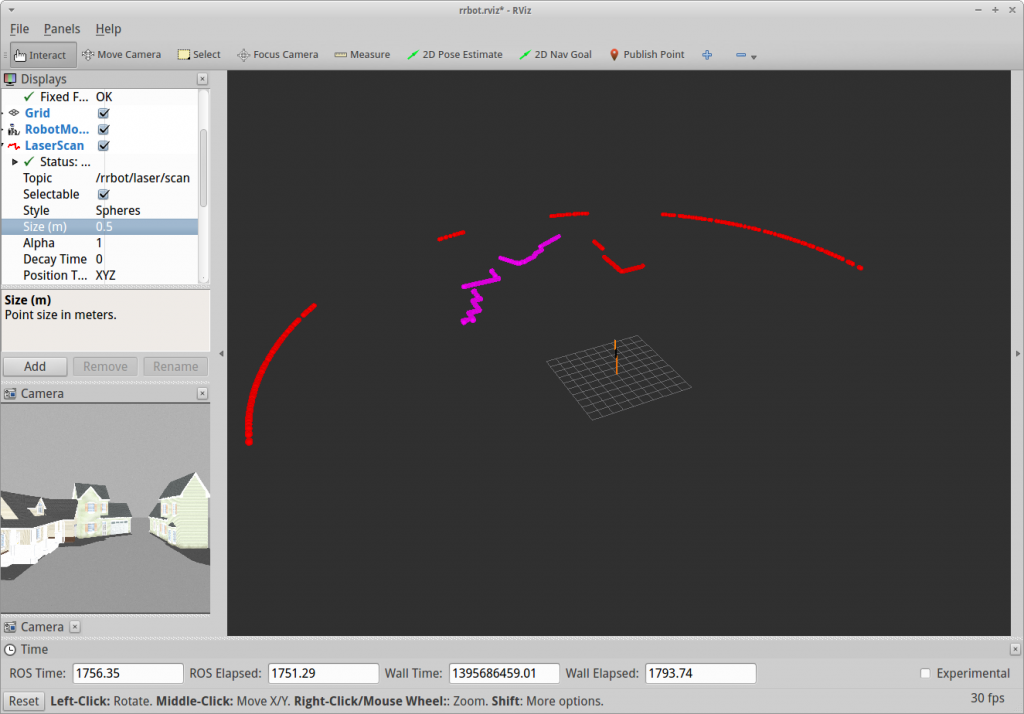 Rviz screen shot showing the RRBot camera and laser-scanner sensor data. Click for higher resolution image.
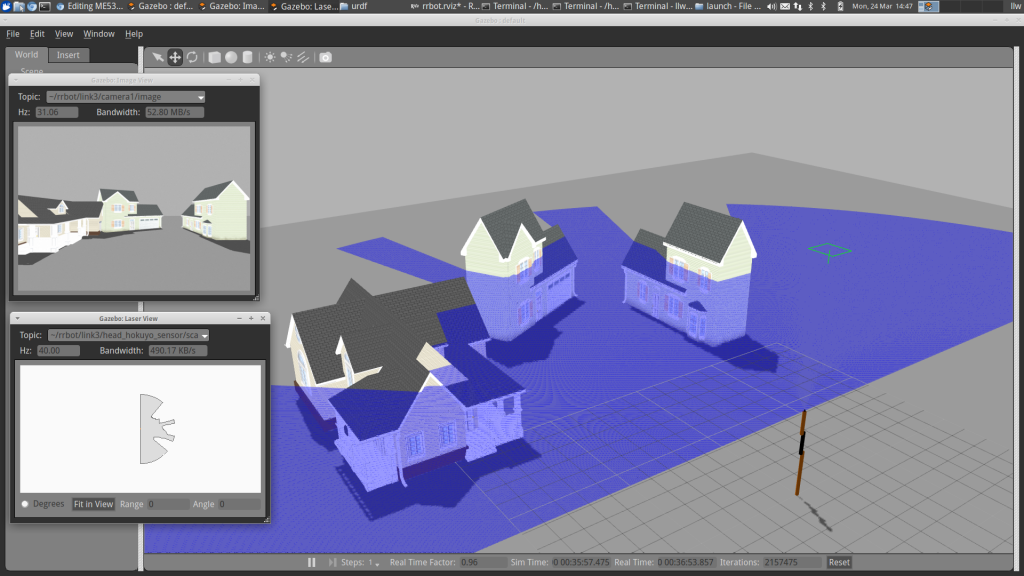


Gazebo screen shot showing the RRBot camera and laser-scanner sensor data. Click for higher resolution image.
- Connect to Ros: ROS Integration
- Gazebo plugins in ROS
- Note: To visualize the laser in gazebo as shown in the Gazebo figure on the right of this web page and in the tutorial here you will also need to set the visualize property of the hokuyo laser plugin to true (i.e. “<visualize>true</visualize>”).
- ROS control Before you do this tutorial be sure that you have the kinetic ros-control packages installed with the command “sudo apt-get install ros-kinetic-ros-control ros-kinetic-ros-controllers”. If these packages are not installed on your system you will get error messages like [ERROR] [WallTime: 1395611537.772305] [8.025000] Failed to load joint_state_controller and [ERROR] [WallTime: 1395611538.776561] [9.025000] Failed to load joint1_position_controller.
- ROS communication with Gazebo
- ROS Plugins
- Note: If you previously downloaded the gazebo_ros_demos tutorial package from this tutorial then you do not need to create a new custom package names “gazebo_tutorials” for this tutorial since the “gazebo_tutorials” package is already present in the directory ~/catkin_ws/src/gazebo_ros_demos/custom_plugin_tutorial.
- Advanced ROS integration
- Gazebo plugins in ROS
Assignment #6
Expand upon your package named edumip_my_robot_gazebo_ros that you created for the previous module’s assignment.
- In your robot’s xacro file urdf/edumip_my_robot.xacro add a differential drive controller plugin that
- Specifies /edumip/cmd as the commandTopic that the plugin will subscribe to.
- Specifies the correct name for your robot’s wheel joints – should be jointL and jointR, respectively, as named elsewhere in your XACRO file.
- Specifies publishWheelJointState to be TRUE to enable the plugin to publish the joint states.
- Specifies the appropriate wheel diameter and wheel separation.
- Specifies /edumip/odom as the odometryTopic that the plugin will publish.
- Use your launch file from the previous module (launch/edumip_my_robot_gazebo.launch) to launch gazebo, then introspect on the topics published by the differential drive controller such as
- /joint_states
- /tf
- /edumip/odom
- Here is the code I used in my xacro file for the differential drive controler plugin:
<gazebo>
 <plugin name="differential_drive_controller" filename="libgazebo_ros_diff_drive.so">
   <legacyMode>false</legacyMode>
   <rosDebugLevel>3</rosDebugLevel>
   <alwaysOn>true</alwaysOn>
   <updateRate>10</updateRate>
   <leftJoint>jointL</leftJoint>
   <rightJoint>jointR</rightJoint>
   <wheelSeparation>${wheel_separation}</wheelSeparation>
   <wheelDiameter>${wheel_radius*2.0}</wheelDiameter>
   <torque>0.1</torque>
   <commandTopic>/edumip/cmd</commandTopic>
   <odometryTopic>/edumip/odom</odometryTopic>
   <odometryFrame>world</odometryFrame>
   <robotBaseFrame>edumip_body</robotBaseFrame>
   <publishTf>1</publishTf>
   <publishWheelTF>false</publishWheelTF>
   <publishWheelJointState>true</publishWheelJointState>
   <wheelAcceleration>0</wheelAcceleration>
   <wheelTorque>0.1</wheelTorque>
   <odometrySource>world</odometrySource>
 </plugin>
</gazebo>
- In your robot’s xacro file urdf/edumip_my_robot.xacro add camera link and a camera plugin
- In your robot’s xacro file add new link on top of the robot named camera_link.
- In your robot’s xacro file add new fixed joint named camera_joint with parent link edumip_base and child link camera_link
- In your robot’s xacro file add a camera plugin
- The camera should be located on the camera_link
- The name of the camera should be camera1′
- The camera plugin should publish images on the topic /edumip/camera1
- Here is the code that I used in my xacro file for the camera plugin:
<gazebo reference="camera_link">
 <sensor type="camera" name="camera1">
   <update_rate>30.0</update_rate>
   <camera name="head">
     <horizontal_fov>1.3962634</horizontal_fov>
     <image>
       <width>800</width>
       <height>800</height>
       <format>R8G8B8</format>
     </image>
     <clip>
       <near>0.02</near>
       <far>300</far>
     </clip>
     <noise>
       <type>gaussian</type>
       <mean>0.0</mean>
       <stddev>0.007</stddev>
     </noise>
   </camera>
   <plugin name="camera_controller" filename="libgazebo_ros_camera.so">
     <robotNamespace>edumip</robotNamespace>
     <alwaysOn>true</alwaysOn>
     <updateRate>10.0</updateRate>
     <cameraName>camera1</cameraName>
     <imageTopicName>image_raw</imageTopicName>
     <cameraInfoTopicName>camera_info</cameraInfoTopicName>
     <frameName>camera_link</frameName>
     <hackBaseline>0.07</hackBaseline>
     <distortionK1>0.0</distortionK1>
     <distortionK2>0.0</distortionK2>
     <distortionK3>0.0</distortionK3>
     <distortionT1>0.0</distortionT1>
     <distortionT2>0.0</distortionT2>
   </plugin>
 </sensor>
</gazebo>


- Use your launch file from the previous module (launch/edumip_my_robot_gazebo.launch) to launch gazebo – you should be able to see the camera link in the gazebo window.
- Use rqt_image_view and select the topic /edumip/camera1/image_raw to see the images generated by the camera plugin.
- Create a RVIZ initialization file in the sub directory of your project rviz named rviz/edumip_gazebo_rviz_hw6.rviz. This rviz initialization file should include visualization of the following data:
- RobotModel of parameter robot_description
- TF of topic /tf
- Odometry of topic /edumip/odom
- Image display of topic /edumip/camera1/image_raw
- Create a new launch file named launch/edumip_my_robot_rviz.launch that does the following:
- Loads the parameter from your xacro file urdf/edumip_my_robot.xacro.
- Launches a robot_state_publisher node that subscribes to the topic /joint_states and publishes on /tf. This is a system-defined node, you do not need to write it.
- Includes the launch entitled joy_twist.launch file from your package joy_twistfrom HW #3. Recall that this launch file launches a standard joy node and also launches the joy_twist C++ node that you wrote for HW# 3.
- Launches RVIZ with the initialization file rviz/edumip_gazebo_rviz_hw6.rvizthat you created for this assignment.
- Run your two launch files – one launches Gazebo and one launches RVIZ. You should be able to drive your robot around in Gazebo with your joystick, and see the robot visualized simultaneously in both Gazebo and RVIZ. In RVIZ you should be able to see the robot, its odometry trail, and the camera image.
- Push It: Push your finished package edumip_my_robot_gazebo_ros to github.com share it with the course instructors. This is the same git repo that you used for the previous assignment – just update it with this module’s work (add, commit, push).
- DEMO IT TO YOUR INSTRUCTORS
If we do not get to this module during the 3-day short course, it would be worthwhile for you to do it on your own as it demonstrates a larger robot system using sophisticated ROS packages to use a simulate mobile robot and Simultaneous Localization and Mapping (SLAM) algorithms to construct a 2D map, and then to use the map to do 2D adaptive monte-carlo navigation of this robot, all using existing available ROS packages.
Topics
- What is a turtlebot;
- Turtlebot ROS documentation.
- Turtlebot Simulation with Gazebo.
- SLAM: Wikipedia, OpenSLAM
- Open source slam projects
- ROS slam gmapping package
- ROS adaptive monte-carlo localization package amcl
Reading
- What is a turtlebot;
- Turtlebot ROS documentation.
- Turtlebot Simulation with Gazebo.
- SLAM: Wikipedia, OpenSLAM
- ROS OpenSLAM Gmapping package documentation
- ROS slam gmapping package documentation
- ROS adaptive monte-carlo localization package amcl package documentation
Assignments to do for This Module
Tutorials
- NOTE that the turtlebot tutorials are not all updated to ROS Kinetic, but the tutorials for ROS Jade should work just fine when kinetic-specific tutorials are unavailable.
- Read 2.1 Turtlebot Developer Habits and and 2.2 Interacting with your Turtlebot a t this link: http://wiki.ros.org/Robots/TurtleBot
- Install the turtlebot packages and the turtlebot simulator Gazebo and Rviz packages.
- Update your Linux system and ROS packages and Install the turtlebot ROS packages as follows:
- Update your PCs Linux system and ROS packages with the commands first sudo apt-get update and then sudo apt-get dist-upgradeTHIS IS IMPORTANT, DO NOT SKIP THIS STEP! If you have not updated recently, the command may pull down several hundreds of MB from the Ubuntu and ROS repositories.
- Install the turtlebot ROS packages as described in the Turtlebot Installation Tutorial – item 3.1 Turtlebot Installation: Installing software onto the turtlebot at this link. Do the “Ubuntu Package Install” with the command sudo apt-get install ros-kinetic-turtlebot ros-kinetic-turtlebot-apps ros-kinetic-turtlebot-rviz-launchers ros-kinetic-turtlebot-simulator ros-kinetic-turtlesim ros-kinetic-turtlebot-teleop ros-kinetic-kobuki-ftdi
- NOTE 1: After you install the above packages, kill your login shells and start a clean shells so that additional required gazebo environment variables are set.
- NOTE 2: You DO NOT need to do a source installation
- NOTE 3: You do not need to run the command rosrun kobuki_ftdi create_udev_rules because your notebook computer will not be physically connected to the kobuki base with a USB cable. The notebook computers that are physically on the turtlebot will be connected to the kbuki base with a USB cable. Your computer will communicate to the turtlebot’s on-board netbook via WiFi.
- Update your Linux system and ROS packages and Install the turtlebot ROS packages as follows:
- Read about the Turtlebot simulator package for ROS kinetic.
- Do the “(Section) 6: Simulation” Tutorials for Gazebo (do not do the “Stage” simulator tutorials).
- Gazebo Bringup Guide: See the simulated turtlebot in Gazebo.
- When you run the command roslaunch turtlebot_gazebo turtlebot_world.launch if you get the error “Invalid <arg> tag: environment variable ‘TURTLEBOT_GAZEBO_WORLD_FILE’ is not set.”, refer to the NOTE 1 item on installation above.
- Explore the Gazebo world: Cruise around in the Gazebo world and use RViz to “see” what’s in it.
- NOTE 4: Do not attempt to install ROS Jade packages, we are using ROS kinetic. So install only ROS kinetic packages.
- NOTE 5: The tutorial’s RVIZ initialization file has some errors in the topic names. For example: when displaying the “DepthCloud” visualization in RVIZ, set its “Color Image Topic” to /camera/rgb/image_raw – this will overlay the Kinect camera image on the Kinect’s depth cloud.
- Make a map and navigate with it: Use the navigation stack to create a map of the Gazebo world and start navigation based on it.
- NOTE 6:There is a bug in the ROS Kinetic package turtlebot_gazebo in the package’s launch file gmapping_demo.launch — its full path is /opt/ros/kinetic/share/turtlebot_gazebo/launch/gmapping_demo.launch (what is the bug?). We can work around this bug by pulling down a copy of this package source into our own ros catkin workspace with the commands:
- cd ~/ros_catkin_ws/src (varies depending the name and location of your catkin workspace).
- git clone https://github.com/turtlebot/turtlebot_simulator
- cd ..
- catkin_make
- source devel/setup.bash
- rospack profile
- Check that you have overlaid this package with your local copy. Now when you give the command roscd turtlebot_gazebo your default direcectory should be set to ~/ros_catkin_ws/src/turtlebot_simulator/turtlebot_gazebo.
- To command the turtlebot motion from the keyboard, this node allows you to use the arrow-keys (up, down, left, right): roslaunch kobuki_keyop safe_keyop.launch
- Save your map to files with your name as part of the filename – for example I might use the command rosrun map_server map_saver -f map_by_louis to generate the map occupancy grid data file map_by_louis.pgm and its associated meta-data file map_by_louis.yaml.
- Examine the contents of the .pgm map file with an image viewer such as gimp.
- Examine the contents of the .yaml metadata map with a text editor or more.
- Note 7: To run the turtlebot AMCL navigation demo, you need to specify the full path name of the .yaml map file, e.g. roslaunch turtlebot_gazebo amcl_demo.launch map_file:=/home/llw/my_first_map.yaml
- NOTE 8: Under ROS kinetic the turtlebot AMCL mapping demo seems to ahve some wonky parameters that cause the robot to rotate (twirl) considerably when given a 2-D navigation goal. My workaround was to run rqt_reconfigure (see below for command) and tune some parameters:
- I set the node move_base parameter “recovery_behavior_allowed” to false (unchecked).
- I set the node move_base parameter “clearing_rotation_allowed” to false (unchecked).
- I set the node move_base navigation parameter speed_lim_w to 1.0 (was 5.8).
- Note that setting these parameters with rqt_reconfigure is ephemeral – the parameters return to the default values specified in the AMCL package then the package is re-launched.
- Be sure to
- List and examine the nodes, topics, service
- Echo some of the published topics
- Run rqt_graph to visualize the topic data paths
- Run rqt_reconfigure with the command rosrun rqt_reconfigure rqt_reconfigure to see some of the configuration parameters of packages that you are running.
- NOTE 6:There is a bug in the ROS Kinetic package turtlebot_gazebo in the package’s launch file gmapping_demo.launch — its full path is /opt/ros/kinetic/share/turtlebot_gazebo/launch/gmapping_demo.launch (what is the bug?). We can work around this bug by pulling down a copy of this package source into our own ros catkin workspace with the commands:
- Gazebo Bringup Guide: See the simulated turtlebot in Gazebo.
Assignment #7
Make a SLAM map and navigate with it with a simulated robot and worls in Gazebo! Do this this assigned tutorial completely and carefully: Make a SLAM map and navigate with it
- Be sure to
- List and examine the nodes, topics, service
- Echo some of the the published topics
- Run rqt_graph to visualize the topic data paths
- Save your map to files with your name as part of the filename – for example I might use the command rosrun map_server map_saver -f map_by_louis to generate the map occupancy grid data file map_by_louis.pgm and its associated meta-data file map_by_louis.yaml.
- Examine the contents of the .pgm map file with an image viewer such as gimp.
- Examine the contents of the .yaml metadata map with a text editor or more.
- Note: To run the AMCL mapping demo, you need to specify the full path name of the .yaml map file, e.g. roslaunch turtlebot_gazebo amcl_demo.launch map_file:=/home/llw/my_first_map.yaml
- Email the two map files (.pgm and .yaml) that you generated to the instructor and the TAs with the subject line “ROS Short Course HW#7 by your_firstname your_lastname”.
- Demonstrate to the TAs or instructor using your map to navigate the playground world with amcl particle filter navigation (you did this in the last part of the SLAM navigation tutorial).